Table of Contents
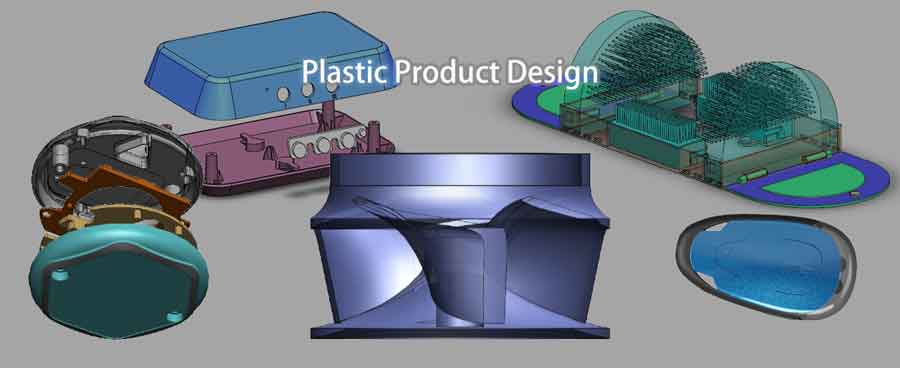
ToggleIntroduction to Boyan's Expertise in Plastic Product Design
Boyan boasts a wealth of experience and a high level of expertise in the design of injection molded plastic products. We’re here to offer a comprehensive suite of services tailored to bring your ideas to life with precision and efficiency. Our offerings include:
- 3D Design of Plastic Products: Transforming initial ideas into tangible 3D models that capture every detail of the envisioned product.
- Injection Mold Design: Crafting the molds required for producing your plastic products with precision.
- 3D Printing Services: Providing rapid prototyping capabilities to help visualize and refine product designs before committing to mass production.
- Material Selection and Recommendation: Guiding you through the best plastic materials for your product, considering durability, aesthetics, and functionality.
Focusing on 3D Design for Plastic Products
In this post, we’ll delve into the intricacies of 3D design for plastic products. We recommend that you provide us with a preliminary design. Boyan will then take over to refine the appearance, structure, and manufacturability for injection molding. Our goal is to save time and enhance efficiency through these optimizations. Let’s discuss this in more detail.
The Processes of Plastic Product Design
Designing a plastic product is a detailed and multi-step process that transforms an initial idea into a tangible item ready for production. Let’s dive into the basic steps involved in this creative journey.
Step 1: Idea Generation and Conceptualization
The first step is all about brainstorming and coming up with the concept of the product. This involves thinking about what components the product will have, what functions it needs to perform, the design style of its appearance, and how it can incorporate elements from popular products in the market.
It’s a phase filled with questions and explorations, aiming to define the core of what the product will be.
Step 2: Initial Sketching
Bringing a product idea to life starts with initial sketching, which is usually a collaboration between designers focusing on the aesthetic and structural aspects. Sketches can be created by hand or digitally, and they might be in 2D or 3D.
This step is about trial and error, slowly refining ideas through various iterations. It’s a time-consuming but essential part of the process, often requiring specialized designers for the product’s modeling phase before moving on to detailed product design.
Step 3: Creating Preliminary Drawings
Once the design elements are compared and a preliminary decision is made during the sketching phase, it’s time to create the initial product drawings. This marks the beginning of moving from concept to a more concrete design.
Step 4: Refining and Improving the Drawings
The focus of this step is on improving the product’s appearance and optimizing it for injection moldability. Key considerations include wall thickness, draft angles for easier mold release, and the layout of the injection gates. Complex parts might require mold flow analysis to identify potential defects in injection molding.
Step 5: Prototyping and Testing
Prototyping has evolved with technology, and 3D printing is now predominantly used to create prototypes, although CNC machining and other methods are sometimes employed.
Prototyping allows designers to test if the design meets the desired functions and to observe the physical product rather than just a 3D image on a computer. It’s a crucial step for verifying the design’s viability.
Step 6: Finalizing the Design for Production
The last step is finalizing the design for production. After all the refining, testing, and modifications, the design is locked down and prepared for the manufacturing process. This is where the design journey culminates in a product ready to be produced and introduced to the market.
Through these steps, a plastic product goes from a mere idea to a fully designed item ready for production, highlighting the importance of meticulous design and thorough testing in creating successful products.
Maximizing Efficiency in Collaboration with Design Companies
When embarking on a product development journey, particularly in the realm of injection-molded product design, striking the right balance between utilizing your design capabilities and leveraging the expertise of a design firm can lead to significant efficiencies in terms of time and cost. Here’s how:
The Ideal Starting Point
If you, as a product developer or client, have some design skills but lack in-depth knowledge about the nuances of injection-molded product design, it’s often most effective to complete the preliminary design on your own. Inviting the design firm to join the project around Step 3 or Step 4 allows for a more streamlined process. Here’s why this approach can save you both time and money:
1. Early Stage Communication Challenges
- The Initial Information Transfer: The early stages of product design require conveying a lot of information and engaging in extensive discussions with the design team. This can be particularly time-consuming, especially when the design involves abstract concepts that are hard to articulate precisely.
2. Potential Misalignments
- Understanding and Cultural Differences: Even after thorough communication, there’s a chance that the design team may not fully align with your vision, particularly where there are cultural differences. This misalignment can lead to frequent revisions, potentially causing frustration and complaints from the designers.
3. Scheduling Conflicts
- Designer Availability: Professional designers often have a packed schedule of projects, which means you’ll need to adapt to their timelines. This could result in waiting periods that might not align with your project timeline.
Self-Sufficiency and Budget Considerations
Unless you have a generous budget that allows for extensive collaboration with a designer from the very beginning, taking charge of the early design work can be a wise strategy. Not only does it conserve resources, but it also empowers you to steer the project’s initial direction before passing the baton to a design company for the specialized optimization and finalization steps. This way, you maximize the efficiency of your collaboration, ensuring that your vision is realized while also respecting the practical constraints of professional design workflows.
Key Points in Plastic Product Design
When you’re starting out with designing a plastic product, getting a few fundamentals right can save you a lot of time and hassle later on by reducing the need for changes. Here are a couple of crucial points to keep in mind:
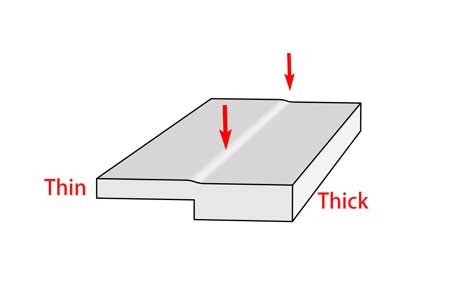
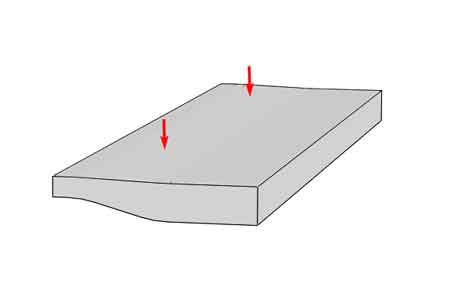
Uniform Wall Thickness
Because injection molding involves cooling and solidifying molten plastic to form the final parts, having parts of your design that are too thick or unevenly thick can lead to problems. These issues include sink marks or an unnecessarily long production cycle. So, aiming for uniform wall thickness in your design is key.
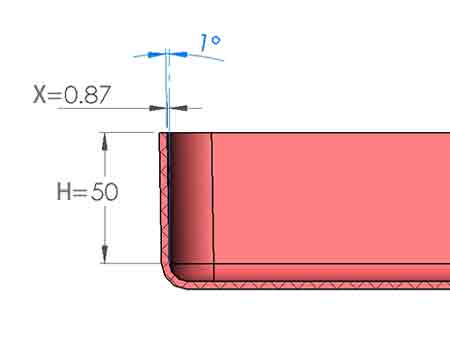
Draft Angles for Easier Demolding
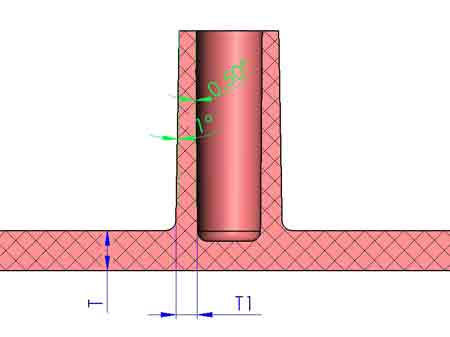
To ensure that the plastic part can be easily removed from the mold, it’s important to design with proper draft angles. This means the sides of your part should taper slightly, allowing for a smooth separation of the mold halves and the easy removal of the core.
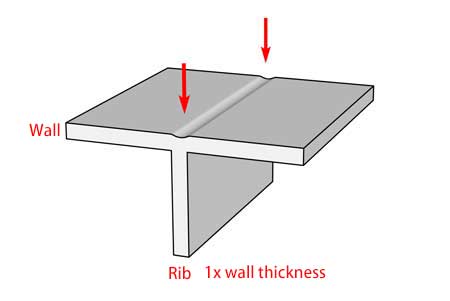
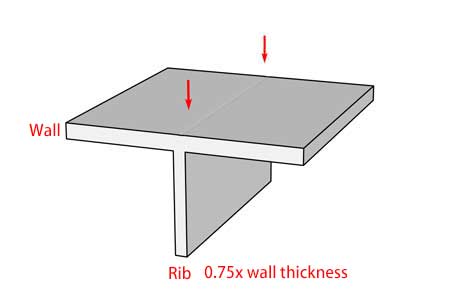
Examples of draft angles:
Our Role in Refining Your Design
When you’re working on your design, focusing on these key aspects is enough. You don’t need to get bogged down in every tiny detail; that’s what we’re here for. We can help refine and perfect your design.
Other Considerations
There are other factors to consider, such as the type and placement of gates (where the molten plastic enters the mold) and parting lines (where the mold halves meet).
However, if these feel too complex or overwhelming, you can leave them to the experts. Our goal is to make the design process as smooth and straightforward for you as possible, ensuring that your product turns out just the way you envisioned it, without getting lost in the weeds of technical details.
Boyan's Design Services
Introduction
Boyan’s design services offer a range of advantages facilitated by our skilled professionals proficient in three-dimensional design software. Our team excels in creating intricate geometric shapes with remarkable speed. However, our designers are more used to being provided with clear design directions, rather than engaging in continuous exploratory work.
Design Direction
Once you’ve completed an initial design, the product’s design style, including its shape, size, and mounting hole positions, is typically established. This makes it easier to focus on optimization and improvements.
Optimization Focus
We primarily focus on checking wall thickness and draft angles. If you’ve already addressed and optimized these areas, the product may only require minor adjustments.
Illustrative Examples
Here are a few examples to illustrate the aspects of design we can work on:
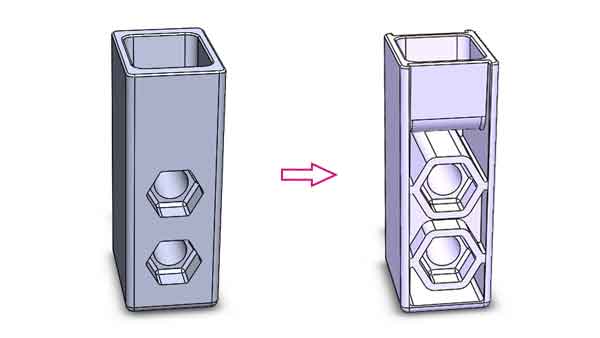
Example 1: Internal Hollowing
As demonstrated by the hollowed-out treatment in this image, entrusting us to handle this process is highly efficient since it directly relates to mold design.
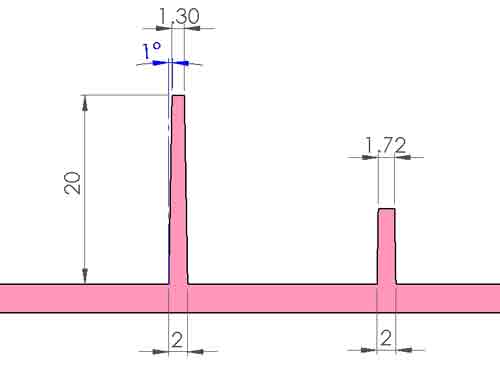
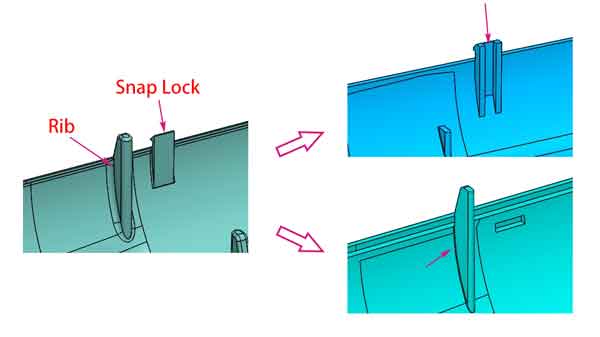
Example 2: Reducing Rib Thickness and Fillets
As illustrated in these images, the thickness of the ribs is too great, and the fillets at their bases are also too large, which further increases local thickness. We can address this by reducing the rib thickness and decreasing the size of the base fillets.
Moreover, regarding the snap lock structures, the current design has excessively thick areas. By creating a hollowed-out section in the middle and retaining rib structures on the sides, we can reduce local wall thickness.
Additionally, we have made adjustments to the distribution and quantity of the snap locks to optimize the design further.
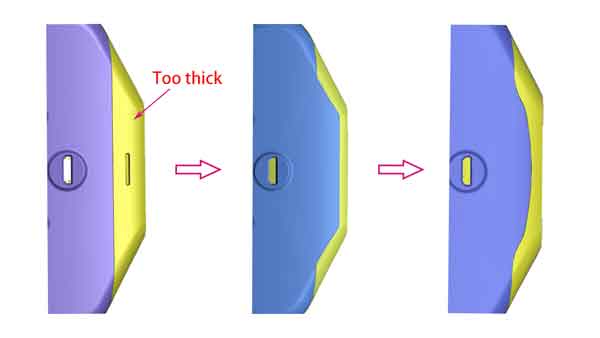
Example 3: Reducing Wall Thickness and Altering Shape
In this example, while reducing the wall thickness, it was also necessary to alter the part’s contour. Our initial design had a part with a straight-line contour. Subsequently, we developed a second design option with an arched contour. We feel that the arched design of the second option better matches the overall style of the part.
Conslusion
In conclusion, Boyan’s plastic product design service seamlessly blends client-led preliminary concepts with our expert refinement process. By leveraging our skillful manipulation, clients achieve not only aesthetically pleasing but also cost-effective and time-efficient results for their injection molded parts.